
Showing posts with label Technology. Show all posts
Showing posts with label Technology. Show all posts
Tuesday, 2 October 2012
Thanks to my previous company for appreciating my efforts
I will like to say Thanks to my previous company for recognizing my efforts and i greatly appreciated the honour you have given me.


Sunday, 17 July 2011
Configure a POP3 service on virtualised Linux machine.
1) Download the IMAP tarball from this website:
IMAP/POP Homepage: http://www.washington.edu/imap/


IMAP/POP Homepage: http://www.washington.edu/imap/
2) Unzip the file with the command
tar -zxvf imap.tar.Z
3) Move into the folder and edit the Makefile:
cd /home/chongming/Desktop/imap-2006e
vi Makefile

4) Change the SSLTYPE=none
Save and exit the file.
5) Make the file:
make lnp
And type y to continue building

6) Move into ipopd directory
cd /ipopd
cp ipop3d /usr/local/bin

7) Move into /etc/xinetd.d and create a file call pop3d into the directory
cd /etc/xinetd.d
vi pop3d

8) Create a PAM authentication to the service. Create imap and pop files into
/etc/pam.d
cd /etc/pam.d
vi pop

Vi imap

9) Start sending mail to chongming with sender as root

10) Using pop3 server to retrieve mail


11) Edit the muttrc file

12) Start to read mail using mutt

The message will appear upon selecting yes to view the message as shown below.

Tuesday, 19 April 2011
My requirements process: How i look at a process for gathering requirements
I have created a short requirement analysis based on a company doing e-commerce payments system. I have not talk to any of the stakeholders and the information i gathered is based on its software workflow and the information it provides on their webpage.
我用一个公司创建电子商务的支付系统创建了一个简短的需求分析. 我的资料收集是基于其软件的工作流程和我所收集的资料, 都是从他们的网页读和分析的。
When i need to gathered requirements, this is how i will look at a process before implementing the necessary codes to create a system.
当我需要收集需求分析资料的时候,这就是我会在这个过程看在实施必要,然后再创建一个系统。
A short example of my use-case:

For their system doing payments, i will list down the key payment business rules in the system.
This alternative case scenarios states how payers will get to choose their desired payments and system will wait for their input before processing.
In any case, sometimes we need to cater for systems that encounter exception scenarios for eg: Something disrupts the workflow and how we can introduce solutions to rectify them
Lastly some of the test cases that we can implemented to make sure the system is well prepared for users usage:
我用一个公司创建电子商务的支付系统创建了一个简短的需求分析. 我的资料收集是基于其软件的工作流程和我所收集的资料, 都是从他们的网页读和分析的。
When i need to gathered requirements, this is how i will look at a process before implementing the necessary codes to create a system.
当我需要收集需求分析资料的时候,这就是我会在这个过程看在实施必要,然后再创建一个系统。
A short example of my use-case:
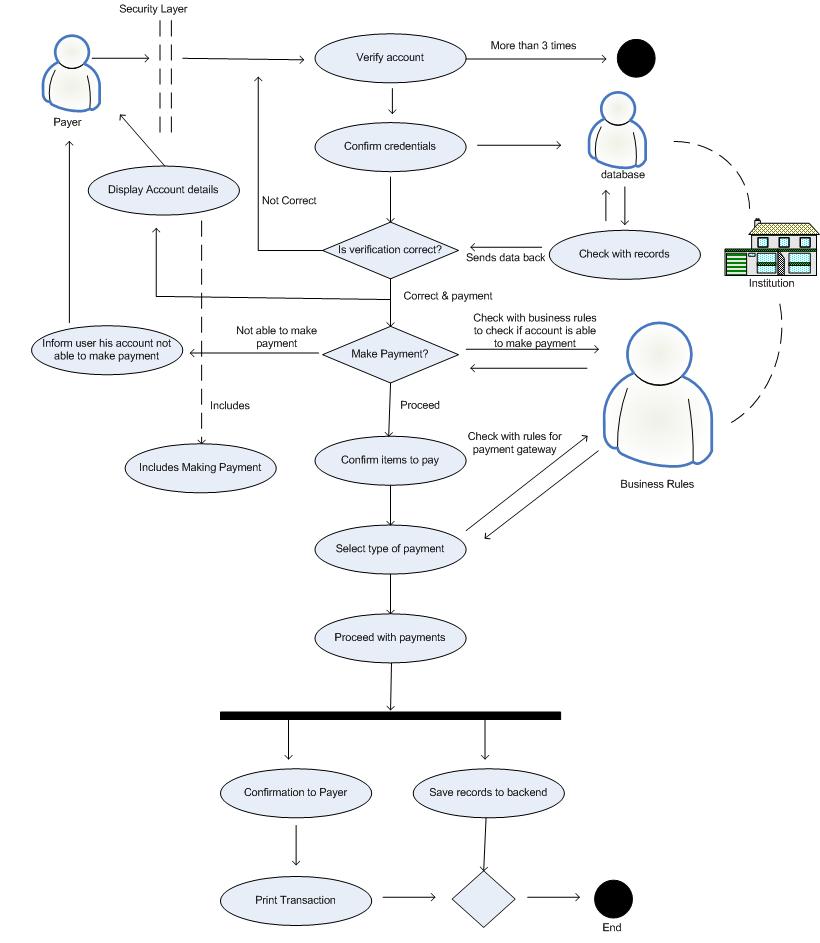
For their system doing payments, i will list down the key payment business rules in the system.
Types of Payments from users with different sets of business rules:
- Credit Cards
- Debit Cards
- E-Giro
- Remittance
- Mobile E-banking users
- Pay-pal
- Corporate Accounts
- Bank branches/Foreign banks
Scenario breakdown:
- Get the user account number and location
- Send the credentials
- Check and verify
- Ask security questions
- Permit access to the account
- View payment items
- User confirms the payment and sends in the payment details
- Business rules to determine the type of settlement services
- Confirm the settlement at the back office
- Confirm settlement to user
Normal Case Scenarios
1. Inputs: User account, password, objects to make payments for. Output: Records inserted into the back end and confirmation made to the payer
The payer’s account number, password, purchased items and his account are both constraints on the work. His account number comes from outside, which is the account number & password that he needs to input. The record account is a constraint imposed by the bank system; in this case, it cannot be changed.
However, the account number, password, purchased items and his account are means to an end the real work to be done is to make the payment transaction.
2. The implementation of the security encapsulation protocols to transfer data
The use of the security features such as SSL to transfer payer details
3. Ensure the payer is correctly identified and connected to the right account.
4. Check the payer account is valid and belongs to the payer.
- The account must be current in used.
- Enough funds in his account
- Credit limit is not exceed
- Displays his payment history
What is the main goal of this process?
Business Event: Payer decides to make payment
What are the information that must be available before the system will starts the functions?
Trigger: Payers account, password, purchased items list/payment items, account database
Preconditions: The payer must have an account
Interested stakeholders: Types of payment account(Visa, Mastercard, E-banking, Paypal, etc), Payment List, workflow, security, goal of the transaction
Active stakeholders: Payer, Institutions
- Verify the payer’s account
- Transfer data using security encryption
- Check the account is valid
- Check with business rules to ensure the account can be used.
- Verify the items which payment is to be made
- Select the type of payment
- Check with the business rules to select the type gateway
- Process with payment and record in the backend
- Process with payment and sends confirmation to payer.
This alternative case scenarios states how payers will get to choose their desired payments and system will wait for their input before processing.
Alternative Case Scenarios
5. Using payment Gateway to make payments
In this scenario, alternative case can arrive when it comes to choosing which payment gateway.
Consider this step 5 scenario:
- Choose to use the Visa/Master, Paypal, and etc gateway based on business rules engine to select payers’ payment preferences
- Using the guiding payment rules to facilitate the transaction work flow
Exception Cases
6. The goal of this exception case is to show how we can handle exceptions when the business workflow deviates from the goal.
Some of the exceptions can be:
- What happens if the server is loaded and transaction process is taking a long time?
- What happens if there is error encountered while inserting records in the database?
- What can go wrong in these steps?
Solutions:
- Some solutions to solve the stress of the servers can be using the load balancer to move the load of users to different servers
- Using the cluster server to handle the load, for eg: if one of the server is down, the second server can be kick start to continued the process
- Implement the functions in the business rules to synchronize the methods for inserting data
- Solutions to handle the error in data insertion will be having a rollback mechanism in the business logic to prevent duplications or dirty records
Misuse Cases & Negative Scenarios
7. This case may surface when an antagonist uses someone’s account to make transactions.
Scenarios to stop/prevent the misuse
- The payer key in an incorrect password for an account that is not his
- Allow the antagonist to key in 3 times (this is for ebanking account)
- Freeze/lock the account when the password is incorrect(this is for ebanking account)
- Send an sms if payment exceed a certain amount (for credit cards)
Outcome
The payment is make successfully, records retained at the institutions’ backend and confirmation make to payers’ records.
Lastly some of the test cases that we can implemented to make sure the system is well prepared for users usage:
Types of testing to deployed
- Unit Testing (Component Testing) – testing of individual module components as they are completed.
- Integration Testing – testing to integrate multiple modules
- User Acceptance Testing – testing by users/customer to get approval that business flow is correct and what they want
- Functional Testing (Black Box Testing) – testing done to ensure the final output is what the user/customers want
- Usability Testing – testing for users where they can get to understand more about the application, as well as the users’ efficiency and productivity.
- Performance Testing (Load Testing, Stress Testing) – refers to testing performed to evaluate whether the system. Eg: Use idx-tsunami stress tool to simulate a high number of users and emulate the using of the system at the same time
Friday, 1 April 2011
Lets use Commands for Linux Partitioning
Nowadays with so much improvements contribute to Linux makes this OS easier for the users as compared 10 yrs ago.
1 significant improvement to Linux is the partition of the disk. Users in these days can simply use the GUI interface or software such as G-Part to partition instead of using commands.
However for me, being a fan of Linux OS, it will be somehow a feeling of dissatisfaction without trying to partition using Linux commands. Today i will blog how i partition using the hard disk in Linux without using GUI.
To save time and to print some screens on how it works, i will use DLX OS using the Bochs Virtual Environment. Below are the steps of how i install DLX into Bochs Env using the Windows system. If you happened to read this post and you like to try partitioning using Linux, simply skip the Bochs part:)
如今有这么多的改善作出贡献的Linux,更十多年前比起来,真的是比较容易多了。
一个显着改善Linux,就是磁盘分区。
在这个世纪里,用户可以简单地使用GUI界面或如G-Part软件进行分区,而不是使用Unix/Linux的命令。
然而,对于我来说,Linux操作系统的风扇喜爱者,不尝试使用Unix/Linux的命令分区磁盘,将是某种的不满情绪.
今天我将博客我是如何分区硬盘,不使用GUI界面在Linux。
为了节省时间,并打印它是如何工作的一些画面,我将用DLX的操作系统使用Bochs的虚拟环境。
下面是我的步骤,如何使用Windows系统安装 DLX在 Bochs的环境中。
如果你碰巧看到这篇文章,你想尝试使用Linux分区,请跳过Bochs这一部分
First i create a disk image in Bosch as shown below:
博世创建一个磁盘映像:




After setting the necessary partition, we need to write/register the partitions.
Enter or type 'w' to write the partition into the system. It should return: 'Partition table has been altered'
在设置了必要的分区,我们需要编写/注册分区。


Below is the confirmation of creating the file systems:


1 significant improvement to Linux is the partition of the disk. Users in these days can simply use the GUI interface or software such as G-Part to partition instead of using commands.
However for me, being a fan of Linux OS, it will be somehow a feeling of dissatisfaction without trying to partition using Linux commands. Today i will blog how i partition using the hard disk in Linux without using GUI.
To save time and to print some screens on how it works, i will use DLX OS using the Bochs Virtual Environment. Below are the steps of how i install DLX into Bochs Env using the Windows system. If you happened to read this post and you like to try partitioning using Linux, simply skip the Bochs part:)
如今有这么多的改善作出贡献的Linux,更十多年前比起来,真的是比较容易多了。
一个显着改善Linux,就是磁盘分区。
在这个世纪里,用户可以简单地使用GUI界面或如G-Part软件进行分区,而不是使用Unix/Linux的命令。
然而,对于我来说,Linux操作系统的风扇喜爱者,不尝试使用Unix/Linux的命令分区磁盘,将是某种的不满情绪.
今天我将博客我是如何分区硬盘,不使用GUI界面在Linux。
为了节省时间,并打印它是如何工作的一些画面,我将用DLX的操作系统使用Bochs的虚拟环境。
下面是我的步骤,如何使用Windows系统安装 DLX在 Bochs的环境中。
如果你碰巧看到这篇文章,你想尝试使用Linux分区,请跳过Bochs这一部分
First i create a disk image in Bosch as shown below:
博世创建一个磁盘映像:


Now i will copy the DLX image into the Bochs directory.
复制DLX形象到Bochs的目录中

The boch.bxrc file.
boch.bxrc文件。

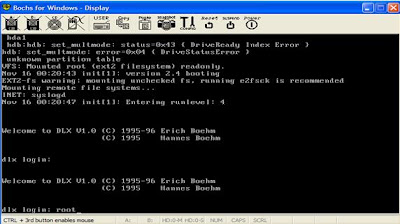
Now go into the dxlinux and click on the run.bat file to start the program. I will be looking at the screen as shown below:
点击进入dxlinux和澳run.bat文件.
Log in as root:
以root身份登录:

Start partioning the drive.
开始磁盘分区
开始磁盘分区
Type fdisk –l to see the status of the disk:

Type fdisk /dev/hdb to start portioning

The steps below are used to partition in sequence.40M means 40MB
下面的步骤是用来磁盘分区
- Select ‘p’ to partition.
- Enter 1 to partion hdb1
- Enter 40M for memory
- Enter ‘n’ to partition
- Enter ‘p’
- Enter 2 to partition hdb2
- Enter 40M for memory
- Repeat the steps of 1 to 7, however at step 2, enter 3 and 4 to partition each HD respectively as well as hdb3 for 10M and hdb4 for 10M
- In total based on the steps just listed, i'm creating 4 partitions. Normally we create partitions for root partition, home partition and swap partition. I prefer to create another 1 more partition to store important documents or files.
- 在对刚刚上市的步骤的基础总额,我创建4个分区。

Enter or type 'w' to write the partition into the system. It should return: 'Partition table has been altered'
在设置了必要的分区,我们需要编写/注册分区。

Now check the partition of my disk using fdisk -l. It should list 4 partitions in the disk.
检查我的磁盘分区使用fdisk- 1

Lets create the file systems for each individual partitions by typing the following commands:
创建文件系统:
1) mke2fs /dev/hdb1
2) mke2fs /dev/hdb2
3) mke2fs /dev/hdb3
4) mke2fs /dev/hdb4
Below is the confirmation of creating the file systems:

Now i will be creating directories and mount each directory to a partition. Its like mounting a thumbdrive into Linux. To mount, we need to create a directory so that it can connect to the thumbdrive or partition and we can access the data in the partition by accessing the directory.
Create the 4 directories first (any name i want)
创建目录和每个目录挂载到分区。:
创建目录和每个目录挂载到分区。:
- mkdir /web
- mkdir /usr/local
- mkdir /usr/local/spare
- mkdir /home

Mounting the partitions to the respective directories.
- Mount –a /dev/hdb1 /home
- Mount –a /dev/hdb2 /usr/local
- Mount –a /dev/hdb3 /usr/local/spare
- Mount –a /dev/hdb4 /usr/home

Type df-k to see the mounted directories:

This should end how to partition and mounting of file systems.
这应该结束如何分区和文件系统的安装。
Thursday, 24 March 2011
Commands for files and directories in Unix /Linux Suse
To remove a directory:
# rmdir <name of directory>
The above command does not delete directories with contents in it. Use this command to delete directories with contents:
# rm -rf <name of directory>
To check the difference between 2 text files in Linux:
# diff <name of file 1> <name of file 2> eg: diff file1.txt file2.txt
To see the format of the file
# file <name of the file>
To find a file in a directory tree
# find dir -name <name of the file> -print
Shell input and output commands wbere i want to send an output to file instead of displaying onto the terminal. I use the redirection '>' character:
# <enter the command first, then the redirection> > test.txt
eg: df -l > check_disk.txt
To append the output to a file, simply issue the command again as shown above with another redirection char.
eg: df -l >> check_disk.txt
# rmdir <name of directory>
The above command does not delete directories with contents in it. Use this command to delete directories with contents:
# rm -rf <name of directory>
To check the difference between 2 text files in Linux:
# diff <name of file 1> <name of file 2> eg: diff file1.txt file2.txt
To see the format of the file
# file <name of the file>
To find a file in a directory tree
# find dir -name <name of the file> -print
Shell input and output commands wbere i want to send an output to file instead of displaying onto the terminal. I use the redirection '>' character:
# <enter the command first, then the redirection> > test.txt
eg: df -l > check_disk.txt
To append the output to a file, simply issue the command again as shown above with another redirection char.
eg: df -l >> check_disk.txt
Wednesday, 23 March 2011
Processes in Linux
To take a peek of process or to stop them is the same as what we do in windows where we right click on the task bar, click to open up the task manager.
The window will display all the processes currently running in windows. To stop or kill the processes, simply select one of them and click on the 'End Task' button.
So how do i do in Unix? When i display the processes in unix, the terminal will display these information on the window:
PID = process id
TTY = terminal device where process is running
STAT = Process stats
TIME = Amount of CPU time used
COMMAND = Command of the process
To view the detailed report of the process:
# ps ax or # ps u or # ps -ef
To kill a process, simply issue the above command, look for the PID number and issue this command with the number:
# kill <ENTER THE PID_NUMBER>
To freeze or stop a process
# kill -STOP <ENTER THE PID_NUMBER>
To restart a process again
# kill -CONT <ENTER THE PID_NUMBER>
The window will display all the processes currently running in windows. To stop or kill the processes, simply select one of them and click on the 'End Task' button.
So how do i do in Unix? When i display the processes in unix, the terminal will display these information on the window:
PID = process id
TTY = terminal device where process is running
STAT = Process stats
TIME = Amount of CPU time used
COMMAND = Command of the process
To view the detailed report of the process:
# ps ax or # ps u or # ps -ef
To kill a process, simply issue the above command, look for the PID number and issue this command with the number:
# kill <ENTER THE PID_NUMBER>
To freeze or stop a process
# kill -STOP <ENTER THE PID_NUMBER>
To restart a process again
# kill -CONT <ENTER THE PID_NUMBER>
Tuesday, 22 March 2011
Groups in Linux
Sometimes i need to add myself into other groups to access certain files or accessing a software.
Currently this is what i have set up for my linux machine. I prefer to have only 1 initial group. In my opinion, the best way is to have users as the initial group. (This varies for different players or grouping patterns in different environment)
To set myself in the initial group in users:
# usermod -g users chongming
To add myself into other groups:
#gpasswd -a chongming audio
#gpasswd -a chongming video
#gpasswd -a chongming floppy
#gpasswd -a chongming cdrom
#gpasswd -a chongming plugdev
Thats the end to groups in Slackware linux
Currently this is what i have set up for my linux machine. I prefer to have only 1 initial group. In my opinion, the best way is to have users as the initial group. (This varies for different players or grouping patterns in different environment)
To set myself in the initial group in users:
# usermod -g users chongming
To add myself into other groups:
#gpasswd -a chongming audio
#gpasswd -a chongming video
#gpasswd -a chongming floppy
#gpasswd -a chongming cdrom
#gpasswd -a chongming plugdev
Thats the end to groups in Slackware linux
Reading the Tsung Reports
This post is to explain the reading of the Tsung reports generate by the Tsung benchmarking tool as shown in my last post.
Below are the screen shots of the reports which Tsung has generate:


Next these are Tsung reports based in graphical description:


Lastly, these are the explanation of the reports which can give the testers some ideas or guidelines on what was going on during the testing.
Reading the report
Network Throughput
The size received and size sent are measured on the ethernet packets sent or received on each hosts during the test.
The size received and size sent are measured on the ethernet packets sent or received on each hosts during the test.
Counters Statistics
The highest rate is the computation of the average of rate every 10 secs. The highest rate is the maximum value for all these estimations.
The Max value for the counter statistics are refering to the number of simultaneous connected users and simultaneous alive users.
The users_count is the number of users created and finished_user_count is the total number of users who complete the test.
Http Response code
Status-Code =
"100" ; Section 10.1.1: Continue
| "101" ; Section 10.1.2: Switching Protocols
| "200" ; Section 10.2.1: OK
| "201" ; Section 10.2.2: Created
| "202" ; Section 10.2.3: Accepted
| "203" ; Section 10.2.4: Non-Authoritative Information
| "204" ; Section 10.2.5: No Content
| "205" ; Section 10.2.6: Reset Content
| "206" ; Section 10.2.7: Partial Content
| "300" ; Section 10.3.1: Multiple Choices
| "301" ; Section 10.3.2: Moved Permanently
| "302" ; Section 10.3.3: Found
| "303" ; Section 10.3.4: See Other
| "304" ; Section 10.3.5: Not Modified
| "305" ; Section 10.3.6: Use Proxy
| "307" ; Section 10.3.8: Temporary Redirect
| "400" ; Section 10.4.1: Bad Request
| "401" ; Section 10.4.2: Unauthorized
| "402" ; Section 10.4.3: Payment Required
| "403" ; Section 10.4.4: Forbidden
| "404" ; Section 10.4.5: Not Found
| "405" ; Section 10.4.6: Method Not Allowed
| "406" ; Section 10.4.7: Not Acceptable
| "407" ; Section 10.4.8: Proxy Authentication Required
| "408" ; Section 10.4.9: Request Time-out
| "409" ; Section 10.4.10: Conflict
| "410" ; Section 10.4.11: Gone
| "411" ; Section 10.4.12: Length Required
| "412" ; Section 10.4.13: Precondition Failed
| "413" ; Section 10.4.14: Request Entity Too Large
| "414" ; Section 10.4.15: Request-URI Too Large
| "415" ; Section 10.4.16: Unsupported Media Type
| "416" ; Section 10.4.17: Requested range not satisfiable
| "417" ; Section 10.4.18: Expectation Failed
| "500" ; Section 10.5.1: Internal Server Error
| "501" ; Section 10.5.2: Not Implemented
| "502" ; Section 10.5.3: Bad Gateway
| "503" ; Section 10.5.4: Service Unavailable
| "504" ; Section 10.5.5: Gateway Time-out
| "505" ; Section 10.5.6: HTTP Version not supported
| extension-code
Main Statistics
Connect is the duration of the connection establishment
Request is the response time for each requests
Page is Response time for each set of requests (a page is a group of request not separated by a thinktime)
Session is the duration of a user session
Error Connection
Error connection is calculate every 10 secs. Below is an example
Name Highest Rate Total Number
Connect is the duration of the connection establishment
Request is the response time for each requests
Page is Response time for each set of requests (a page is a group of request not separated by a thinktime)
Session is the duration of a user session
Error Connection
Error connection is calculate every 10 secs. Below is an example
Name Highest Rate Total Number
Error connection timeout 2/sec 68
For every 10 sec, tsung will dump all its counters for calculation. Therefore the explanation for Highest rate is throughout the whole session,for 10 secs, maximum of timeout found is 2 per second.
Monday, 21 March 2011
IDX-Tsunami/Tsung: Benchmark Testing on the App Server
Today i sure list the steps and ways to use the Tsung tool to check how much stress/load the server could take.
I have use Geronimo to test out the effectiveness of tsung. Previously i have tested it out on Jboss to determine the performance of the application while i was working in my last company. The results are marvelous and we did what we could to improve the areas of the application before it goes live.
Below are the steps to use the tsung benchmarking tool.
Start the Geronimo Application Server in Unix

Open up the web browser and type in the url to access the application. eg: http://localhost:8080/TEST/start.jsp
Next enter this command to start up Tsung
# tsung start
To stop Tsung, enter the command below
# tsung stop
In the print screen below, you may have notice that tsung sends notification on the terminal indicating that the tsung recorder is not started. Do not worry about that as the recorder is to records users ways of using the system and Tsung will generate a scenario xml file to stress test the application.

to check the number of users being simulate during testing on the terminal
# tsung status
The figure below is a brief report on its status in testing the application

Next generate the reports for the Geronimo testing
cd into the tsung folder when the data is store

Now lets type the commands to generate the reports from the test

I will list down the reports next time once i have compile all the screenshots ready to be upload into the system.
Hope Tsung helps you to stress test your application.
Friday, 18 March 2011
Installing the WICD software to scan for wireless ip address
WICD is fd and wireless network manager for Linux.
Some features include:
- Ability to connect to wired and wireless networks
- Profiles for each wireless network and wired network
- Many encryption schemes, some of which include WEP/WPA/WPA2
- Compatible with wireless-tools
I'm installing this software in my linux machine. So after installing, i need to start up the Wicd in my machine by opening up a terminal:
# su root
# key in my root password
Start up Wicd by executing this command:
# wicd
However the method above requires me to start up the wicd everytime when i restart my machine. Therefore i chose to edit the rc.d file to start up wicd automatically.
Check your /etc/rc.d directory and make sure rc.wicd is executable
Using vi editor, add in these lines into the file
Some features include:
- Ability to connect to wired and wireless networks
- Profiles for each wireless network and wired network
- Many encryption schemes, some of which include WEP/WPA/WPA2
- Compatible with wireless-tools
I'm installing this software in my linux machine. So after installing, i need to start up the Wicd in my machine by opening up a terminal:
# su root
# key in my root password
Start up Wicd by executing this command:
# wicd
However the method above requires me to start up the wicd everytime when i restart my machine. Therefore i chose to edit the rc.d file to start up wicd automatically.
Check your /etc/rc.d directory and make sure rc.wicd is executable
Using vi editor, add in these lines into the file
if [ -x /etc/rc.d/rc.wicd ]; thenRestart my machine to check if it load wicd automatically
/etc/rc.d/rc.wicd start
fi
Monday, 14 March 2011
Mouse setup in Linux for slackware
Mouse with wheel setup in Slackware.
The option resolution adjusts the speed of the mouse on the screen. Use the
log in as root
open up the xorg.conf file using vi editior or kwrite
# kwrite /etc/X11/xorg.conf
Inside the file, search for this section "Input Device"
Check for "Mouse0"
Add in these lines into xorg.conf
Section "Input Device"
Identifier "Mouse0"
Driver "mouse"
Option "Protocol" "IMPS/2"
Option "Device" "/dev/psaux"
Option "Buttons" "5"
Option "ZAxisMapping" "4 5"
Option "Core Pointer"
Option "SendCoreEvents" "true"
ZAxisMapping defines which of these buttons will be used for the mousewheel.The option resolution adjusts the speed of the mouse on the screen. Use the
log in as root
open up the xorg.conf file using vi editior or kwrite
# kwrite /etc/X11/xorg.conf
Inside the file, search for this section "Input Device"
Check for "Mouse0"
Add in these lines into xorg.conf
Section "Input Device"
Identifier "Mouse0"
Driver "mouse"
Option "Protocol" "IMPS/2"
Option "Device" "/dev/psaux"
Option "Buttons" "5"
Option "ZAxisMapping" "4 5"
Option "Core Pointer"
Option "SendCoreEvents" "true"
Option "Resolution" "1600"
Restart the X server to load in all the new configurations.
To edit the speed of the mouse pointer on the screen,
open up the command line and use the xset command
The command below is what i have used with good results
# xset m 5 1
To set the xset to default, on the command line type:
# xset m default
Saturday, 12 March 2011
IDX-Tsunami/Tsung The load testing tool
I need a reliable load balancing test tool. Jmeter is available online as a free tool but it seems that it does not provide more in depth test results.
I manage to search online that there is a free load balance tool and i decide to check it out and use it to test it in my Linux machine before i introduce & recommend this tool to test the applications i developed at work.
Here are some of the introductions of Tsung and Tsung can be download from:
http://tsung.erlang-projects.org/
Development of idx-tsunami
Tsunami is developed in Erlang and this is where the power of Tsunami relies. Tsunami is based on the Erlang OTP (Open Transaction Platform) and inherits several characteristics from Erlang:
- Performance: Erlang has been made to support hundred thousands of lightweight processes in a single virtual machine.
- Scalability: Erlang development environment is naturally distributed,promoting the idea of processes location transparency.
- Fault Tolerance: Erlang has been built to develop robust, fault-tolerant systems. As such,wrong answer sent from the server to Tsunami does not make the whole running benchmark crash.
For Tsung to work, i need to install ERLANG or Ericsson language platform in my machine. These are the steps to install the platform
Download this application from:
http://www.erlang.org/download.html
Unzip the folder
# tar -zxvf <erlang folder.tar.gz>
http://www.erlang.org/download.html
Unzip the folder
# tar -zxvf <erlang folder.tar.gz>
Move into the unzip folder
# cd otp_src_R12B-0
# ./configure –prefix=/usr/local/erlang
# make
# make install
Now i shall continue to install the Tsung or idx-tsunami in my system
Download Tsung from:
Select the latest distribution and proceed with the instructions below
Unzip the folder

Configure the tsung and make install

Next install by using:
# make
# make install
Mounting a NTFS partition or drive to Linux
Steps to mount a NTFS drive to SUSE. For SUSE, the driver to access the ntfs in SUSE is already available when SUSE is install on the computer.
List out all the file systems on the hard drive
# df -h
# dmesg
# dmesg |grep hda
Create a directory to allow the ntfs partition to mount into
# mkdir /mnt/win
Mount the ntfs partition to /mnt/win
# mount -t ntfs /dev/sda2 /mnt/win
Check if windows partition is registered.
# cat /etc/fstab
To access the ntfs partition, simply access the directory i created
# cd /mnt/win
For slackware, driver to access the ntfs partition is not installed. For me, i installed the ntfs-3g to help me to mount ntfs partition to linux directory. The ntfs-3g package is available at the SlackBuilds webpage,
After installing, use this command to mount:
# ntfs-3g -o uid=chongming /dev/sdv1 /media/hd
/dev/sdv1 is the drive partition detect by linux system. Use df -h to detect the drives.
List out all the file systems on the hard drive
# df -h
# dmesg
# dmesg |grep hda
Create a directory to allow the ntfs partition to mount into
# mkdir /mnt/win
Mount the ntfs partition to /mnt/win
# mount -t ntfs /dev/sda2 /mnt/win
Check if windows partition is registered.
# cat /etc/fstab
To access the ntfs partition, simply access the directory i created
# cd /mnt/win
For slackware, driver to access the ntfs partition is not installed. For me, i installed the ntfs-3g to help me to mount ntfs partition to linux directory. The ntfs-3g package is available at the SlackBuilds webpage,
After installing, use this command to mount:
# ntfs-3g -o uid=chongming /dev/sdv1 /media/hd
/dev/sdv1 is the drive partition detect by linux system. Use df -h to detect the drives.
Friday, 11 March 2011
How to write a mysql plan xml file for Geronimo
To create a database pool in Geronimo, i need to write a mysql xml plan for Geronimo. Without this xml file, the pool could not be create. Below are the steps to follow to create the xml file.
Writing this plan is essential to connect to external database. This plan is to be go hand in hand with a file in geronimo repository. The path to the respository:
/home/chongming/geronimo-2.1/repository/org/tranql/tranql-connector-ra/1.3/tranql-connector-ra-1.3.rar
Firstly we need to download the mysql connector from:
Create folder under /home/chongming/geronimo-2.1/respository:
# mkdir mysql/mysql-connector-java/3.1.14-bin
Copy the sql-connector jar file into the directory
# cp mysql-connector-java /home/chongming/geronimo-2.1/respository/mysql/mysql-connector-java/3.1.14-bin
Below is an example of creating a mysql-geronimo-plan.xml file. Edit the file as necessary
In fact what i need to key in under the tags are:
- <config-property-setting name="UserName"> = Username of my database
- <config-property-setting name="Password"> = Password of my database
- <config-property-setting name="Driver"> = The driver for the database
- <config-property-setting name="ConnectionURL"> = The connection url for the apps to database
- <global-jndi-name> = The jndi for the database
========================================================
<?xml version="1.0" encoding="UTF-8"?>
<connector xmlns="http://geronimo.apache.org/xml/ns/j2ee/connector-1.2">
<dep:environment xmlns:dep="http://geronimo.apache.org/xml/ns/deployment-1.1">
<dep:moduleId>
<dep:groupId>user</dep:groupId>
<dep:artifactId>jdbcdatasource</dep:artifactId>
<dep:version>2.0</dep:version>
<dep:type>car</dep:type>
</dep:moduleId>
<dep:dependencies>
<dep:dependency>
<dep:groupId>mysql</dep:groupId>
<dep:artifactId>mysql-connector-java</dep:artifactId>
<dep:version>3.1.14-bin</dep:version>
<dep:type>jar</dep:type>
</dep:dependency>
</dep:dependencies>
</dep:environment>
<resourceadapter>
<outbound-resourceadapter>
<connection-definition>
<connectionfactory-interface>
javax.sql.DataSource
</connectionfactory-interface>
<connectiondefinition-instance>
<name>MusicDS</name>
<config-property-setting name="UserName">
chongming
</config-property-setting>
<config-property-setting name="Password">
password
</config-property-setting>
<config-property-setting name="Driver">
com.mysql.jdbc.Driver
</config-property-setting>
<config-property-setting name="ConnectionURL">
jdbc:mysql://localhost:3306/music
</config-property-setting>
<config-property-setting name="CommitBeforeAutocommit">
false
</config-property-setting>
<config-property-setting name="ExceptionSorterClass">
org.tranql.connector.NoExceptionsAreFatalSorter
</config-property-setting>
<connectionmanager>
<local-transaction/>
<single-pool>
<max-size>10</max-size>
<min-size>0</min-size>
<blocking-timeout-milliseconds>
5000
</blocking-timeout-milliseconds>
<idle-timeout-minutes>
30
</idle-timeout-minutes>
<match-one/>
</single-pool>
</connectionmanager>
<global-jndi-name>
jdbc/MusicDB
</global-jndi-name>
</connectiondefinition-instance>
</connection-definition>
</outbound-resourceadapter>
</resourceadapter>
</connector>
<connector xmlns="http://geronimo.apache.org/xml/ns/j2ee/connector-1.2">
<dep:environment xmlns:dep="http://geronimo.apache.org/xml/ns/deployment-1.1">
<dep:moduleId>
<dep:groupId>user</dep:groupId>
<dep:artifactId>jdbcdatasource</dep:artifactId>
<dep:version>2.0</dep:version>
<dep:type>car</dep:type>
</dep:moduleId>
<dep:dependencies>
<dep:dependency>
<dep:groupId>mysql</dep:groupId>
<dep:artifactId>mysql-connector-java</dep:artifactId>
<dep:version>3.1.14-bin</dep:version>
<dep:type>jar</dep:type>
</dep:dependency>
</dep:dependencies>
</dep:environment>
<resourceadapter>
<outbound-resourceadapter>
<connection-definition>
<connectionfactory-interface>
javax.sql.DataSource
</connectionfactory-interface>
<connectiondefinition-instance>
<name>MusicDS</name>
<config-property-setting name="UserName">
chongming
</config-property-setting>
<config-property-setting name="Password">
password
</config-property-setting>
<config-property-setting name="Driver">
com.mysql.jdbc.Driver
</config-property-setting>
<config-property-setting name="ConnectionURL">
jdbc:mysql://localhost:3306/music
</config-property-setting>
<config-property-setting name="CommitBeforeAutocommit">
false
</config-property-setting>
<config-property-setting name="ExceptionSorterClass">
org.tranql.connector.NoExceptionsAreFatalSorter
</config-property-setting>
<connectionmanager>
<local-transaction/>
<single-pool>
<max-size>10</max-size>
<min-size>0</min-size>
<blocking-timeout-milliseconds>
5000
</blocking-timeout-milliseconds>
<idle-timeout-minutes>
30
</idle-timeout-minutes>
<match-one/>
</single-pool>
</connectionmanager>
<global-jndi-name>
jdbc/MusicDB
</global-jndi-name>
</connectiondefinition-instance>
</connection-definition>
</outbound-resourceadapter>
</resourceadapter>
</connector>
Completing this xml file should able to create the pool once it is deploy into the app server
Thursday, 10 March 2011
Deploying Enterprise Java Beans file
There are actually 3 ways to deploy the Java source files into the server. The 3 ways are:
Start the server and navigate to this address: http://localhost:8080/console
Enter the username and password
On the left handed menu, under Applications, click on Deploy New

At this page, select the appropriate file to be deploy into the server as shown below:


Deploy Using the Command Line Geronimo
For my commands as show above, I copy my .ear file into geronimo home folder. cd into the geronimo home folder and execute this command:

- Deploy using the Web Console
- Deploy Using the Hot Deploy Folder
- Deploy Using the Command Line
Start the server and navigate to this address: http://localhost:8080/console
Enter the username and password
On the left handed menu, under Applications, click on Deploy New

At this page, select the appropriate file to be deploy into the server as shown below:

Click install after selecting the folder and it will displays its status whether if it is deploy successfully or vice versa.

Deploy Using the Hot Deploy Folder Geronimo
- Navigate to the geronimo home directory
- Navigate to the deploy directory
- Copy the EJB file into the deployment folder
- Open the browser and type the localhost and context root address

Deploy Using the Command Line Geronimo
For my commands as show above, I copy my .ear file into geronimo home folder. cd into the geronimo home folder and execute this command:

This should concludes the 3 different ways of deploying Java .war or .ear files into the Geronimo.
Subscribe to:
Posts (Atom)
-
Most people should have know or heard about this book Security Analysis which is compiled by Graham and Dodd. I have start reading this book...
-
 This post is to explain the reading of the Tsung reports generate by the Tsung benchmarking tool as shown in my last post. Below are the scr...
 -
I received a question asking me what is the difference between Treasury Centre (TC), In-house bank (IHB) and Shared Services Centre (SSC). ...